泉盛 K1 改装 SI4732 及固件
Quansheng K1 SI4732 Mod & Firmware
泉盛 K1 改装 SI4732
在泉盛 UV-K1(K1)上加装基于 SI4732-A10 的接收小板,可扩展 短波 AM、广播 FM、单边带(SSB) 等收听能力。硬件按本文 PCB 制作并焊接,主机板只需引出少量信号;刷入配套 F4HWN 系固件后即可使用。
改装涉及拆机与细线焊接,操作前请备份校准数据,风险自负。
开源固件仓库
固件源码、Docker 编译脚本与说明见 GitHub:
koocyton/quansheng-k1-f4hwn-si4732
本仓库在 armel/uv-k1-k5v3-firmware-custom(F4HWN / Fusion,面向 PY32F071 的 UV-K1 / UV-K5 V3)基础上维护,并包含 K1 外接 SI4732 的 Si4732 编译预设。
自行编译(Docker)
环境需安装 Docker 与 Bash(Linux、macOS、WSL 或 Windows Git Bash)。
克隆仓库后执行:
./compile-with-docker.sh Si4732
脚本在 Docker 内完成配置与编译,产物位于 build/Si4732/(含 f4hwn.si4732.bin)。首次运行会拉取/构建镜像,可能需数分钟。
其它版本(Fusion、Bandscope、Broadcast 等)及 ./compile-with-docker.sh All 见仓库 README。
改装板 PCB
下图是 K1 专用 SI4732 转接板布局(丝印 5163.xyz)。板上已集成 SI4732、20 MHz 晶振及必要外围;对外主要引出 GND、AMI(芯片 AM 天线输入)、RST(复位),顶部另有 U.FL 座可接独立天线以改善 FM。

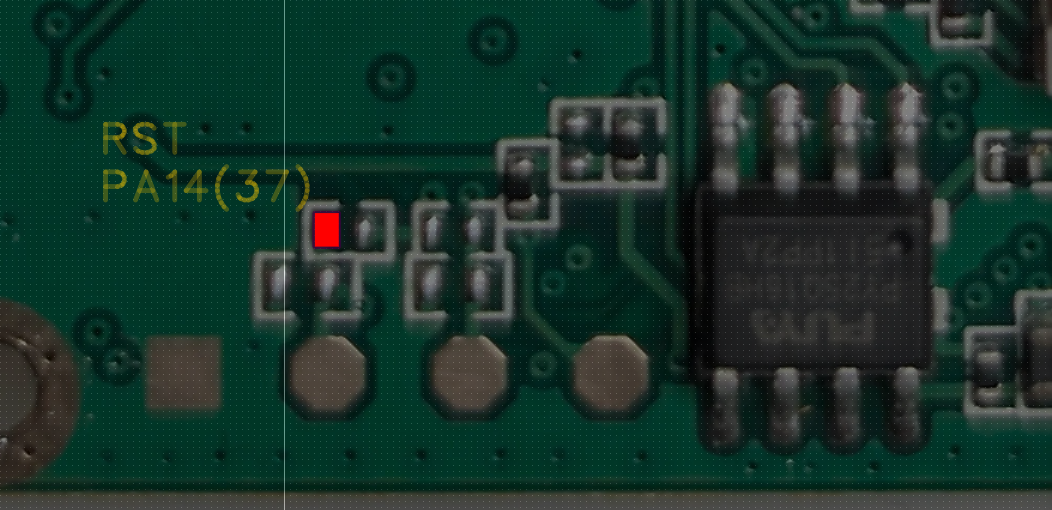
主机 RST 接线(PA14)
SI4732 的 RST 需接到 K1 主控 PY32F071 的 PA14(封装引脚 37)。下图红框为推荐焊点位置,焊接时务必对照实物,避免误接到相邻 pad。
接线概要
| 改装板 | 说明 | K1 侧 |
|---|---|---|
| GND | 共地 | 主板地 |
| AMI | SI4732 AM/中波天线输入 | 接原 FM 芯片(BK1080)天线通路,与 K5/K6 类 SI4732 改法相同 |
| RST | 复位,低有效 | PA14(37),见上图 |
I2C(SCLK/SDIO 等)与音频等走线已在转接板上处理;若自行打板,请以 k1.si4732.png 为准核对网络。
嘉立创 EDA 工程(专业版导入):ProDoc_K1-AD8091_2026-06-04.epro2
建议流程:
- 按 PCB 图焊接 SI4732 小板(细线、防静电)。
- 拆 K1 外壳,将小板 GND / AMI / RST 按上表接到主机(RST 务必接 PA14)。
- 需要更好 FM 接收时,可为板上 U.FL 口接短线天线。
- 装回外壳前通电前再检查一遍焊点与短路。
固件下载与刷机
本站提供与 Si4732 预设一致的预编译固件(也可从上述 GitHub build/Si4732/ 或 Release 获取):
f4hwn.si4732.bin — 点击下载
刷机推荐使用浏览器工具 UVTools2(Chrome / Edge):
- 数据线连接电脑,手持台进入 DFU 刷机模式(先进入刷机模式再插线,与 K5 系列相同)。
- 在 UVTools2 中选择上述
f4hwn.si4732.bin。 - 选择对应串口,执行 Flash Firmware。
- 刷机完成后建议用 UVTools2 备份校准数据(Dump Calib),便于以后恢复。
收听操作(参考)
固件逻辑与 F4HWN 系相近,常见按键(以实际固件菜单为准):
[F+0]     进入收音机 / SI4732 模式
短按 [F]  切换 FM / AM 等模式
长按 [F]  进入或退出单边带(SSB)
SSB 下短按 [F]  可切换 USB / LSB / CW 等(视固件版本)
频率调节、步进等与其它 F4HWN K1 固件一致,可在 SysInf 等菜单中查看版本号确认刷写成功。
相关文章
- 泉盛 K5 K6 改 Si4732 电路设计 — K5/K6 放大器 PCB 思路可参考
- K5 K6 V1 单边带补丁与刷机 — 刷机模式与 SSB 操作习惯类似
Quansheng K1 SI4732 Mod
Add a small SI4732-A10 receiver board to the Quansheng UV-K1 (K1) to listen on shortwave AM, broadcast FM, and single-sideband (SSB). Build the adapter from the PCB below, wire a few signals on the main board, then flash the matching F4HWN-based Si4732 firmware.
Opening the radio and fine-pitch soldering are required. Back up calibration data first. Proceed at your own risk.
Open-source firmware repository
Firmware sources, Docker build scripts, and hardware notes live on GitHub:
koocyton/quansheng-k1-f4hwn-si4732
This repo is a fork of armel/uv-k1-k5v3-firmware-custom (F4HWN / Fusion for PY32F071 on UV-K1 and UV-K5 V3). The Si4732 CMake preset adds support for an external SI4732 board on the K1.
Build from source (Docker)
Prerequisites: Docker and Bash (Linux, macOS, WSL, or Git Bash on Windows).
Clone the repository, then run:
./compile-with-docker.sh Si4732
The script configures and builds inside Docker. Output appears under build/Si4732/ (including f4hwn.si4732.bin). The first run may take a few minutes while the Docker image is created.
Other presets (Fusion, Bandscope, Broadcast, …) and ./compile-with-docker.sh All are documented in the repository README.
Adapter PCB
Layout of the K1 SI4732 adapter (silkscreen 5163.xyz). The board includes the SI4732, a 20 MHz crystal, and passives. Main signals: GND, AMI (AM antenna input), RST (reset). A U.FL pad at the top accepts an optional antenna for better FM.
Main-board RST (PA14)
Wire RST to PA14 (pin 37) on the PY32F071. The photo below marks a recommended solder point—verify against your board before soldering.
Wiring summary
| Adapter | Description | K1 side |
|---|---|---|
| GND | Common ground | Main-board ground |
| AMI | SI4732 AM / MW antenna input | Original BK1080 FM chip antenna path (same idea as K5/K6 SI4732 mods) |
| RST | Reset, active low | PA14 (37) — see photo |
I2C and audio routing stay on the adapter. Use k1.si4732.png as the reference when ordering or assembling the PCB.
EasyEDA project (Pro import): ProDoc_K1-AD8091_2026-06-04.epro2
Suggested steps:
- Assemble the adapter (fine wire, ESD care).
- Open the K1 and connect GND, AMI, and RST (RST → PA14).
- Optionally add a short antenna on the U.FL port for FM.
- Check joints and shorts before power-on.
Firmware download & flashing
Prebuilt K1 + SI4732 image (same as the Si4732 build):
f4hwn.si4732.bin — download
Flash with UVTools2 in Chrome or Edge:
- Put the radio in DFU flash mode, then connect USB (same habit as K5 series).
- Select
f4hwn.si4732.binin UVTools2. - Pick the serial port and run Flash Firmware.
- After flashing, dump calibration with UVTools2 (recommended).
Listening (reference)
Typical F4HWN-style keys (confirm in your firmware menu):
[F+0]           Enter radio / SI4732 mode
Short [F]       Switch FM / AM, etc.
Long [F]        Enter or exit SSB
Short [F] (SSB) Switch USB / LSB / CW (version-dependent)
Check SysInf for the firmware version after flashing.